早先在 Windows 下使用 MSYS + MinGW32 来制作 mips 工具链的过程让我记忆犹新:那就是在 Linux 里只要数分钟就能编译完成的 libgcc.a 在 Windows 里面需要半个小时以上才能完成,而且到最后使用 ar 命令将一堆 .o 文件合并为 .a 时,居然因为命令行超过 32KB 而导致命令执行失败。到最后是直接使用了 Linux 里面编译好的文件。
哎。。。这都是 Windows 过于复杂的进程创建机制导致的。。。
最近打算更新 MinGW 环境,发现 mingw-w64 比 mingw32 更优秀,因此就打算制作一个基于最新 gcc 的 mingw-w64 工具链。
由于打算在 Linux 里面来制作一个在 Windows 里面运行的 mingw-w64 工具链,因此整个制作过程将分为两个阶段:第一阶段是制作在 Linux 里运行的 mingw-w64 工具链;第二阶段是使用此工具链来制作在 Windows 里面运行的工具链。
两个阶段使用相同的源代码,需要的代码包如下:
gmp-6.0.0: http://ftp.gnu.org/gnu/gmp/gmp-6.0.0a.tar.bz2
mpfr-3.1.3: http://ftp.gnu.org/gnu/mpfr/mpfr-3.1.3.tar.bz2
mpc-1.0.3: http://ftp.gnu.org/gnu/mpc/mpc-1.0.3.tar.gz
isl-0.12: http://isl.gforge.inria.fr/isl-0.12.tar.bz2 (注意:不要使用 isl-0.13 或以上的版本,binutils 和 gcc 不支持)
cloog-0.18.4: http://www.bastoul.net/cloog/pages/download/cloog-0.18.4.tar.gz
binutils-2.25: http://ftp.gnu.org/gnu/binutils/binutils-2.25.tar.bz2
gcc-5.2.0: http://ftp.gnu.org/gnu/gcc/gcc-5.2.0/gcc-5.2.0.tar.bz2
mingw-w64-v4.0.4: http://sourceforge.net/projects/mingw-w64/files/mingw-w64/mingw-w64-release/mingw-w64-v4.0.4.tar.bz2/download
libiconv-1.14: http://ftp.gnu.org/gnu/libiconv/libiconv-1.14.tar.gz
m4-1.4.17: http://ftp.gnu.org/gnu/m4/m4-1.4.17.tar.bz2
libtool-2.4.6: http://ftp.gnu.org/gnu/libtool/libtool-2.4.6.tar.xz
以下为第一阶段的编译过程:
编译环境:
编译环境 (build): x86_64-pc-linux-gnu
运行环境 (host): x86_64-pc-linux-gnu (Ubuntu 15.04 AMD64)
目标环境 (target): x86_64-w64-mingw32 (Windows mingw-w64)
生成的工具链存放目录 (prefix): /home/hackpascal/mingw/toolchain/usr
设置环境变量:
export PREFIX=/home/hackpascal/mingw/toolchain/usr
export TARGET=x86_64-w64-mingw32
export BUILD=x86_64-pc-linux-gnu
export PATH=$PATH:$PREFIX/bin
编译 gcc 所依赖的库 gmp mpfr mpc isl cloog。
这些库需要依次编译,因为它们存在依赖关系。其中 gmp 与 mpfr 为必需的,其余可选,但是跟优化相关。全部编译为静态,以防止工具链在运行时找不到这些库(毕竟工具链没有安装在系统目录,$PREFIX/lib 里面的文件不能被搜索到,修改 LD_LIBRARY_PATH 又不方便)。
[gmp-6.0.0]
./configure –prefix=$PREFIX –build=$BUILD –disable-shared –enable-static –enable-cxx
make
make install
[mpfr-3.1.3]
./configure –prefix=$PREFIX –build=$BUILD –disable-shared –enable-static –with-gmp=$PREFIX
make
make install
[mpc-1.0.3]
./configure –prefix=$PREFIX –build=$BUILD –disable-shared –enable-static –with-mpfr=$PREFIX –with-gmp=$PREFIX
make
make install
[isl-0.12]
./configure –prefix=$PREFIX –build=$BUILD –disable-shared –enable-static –with-gmp-prefix=$PREFIX
make
make install
[cloog-0.18.4]
./configure –prefix=$PREFIX –build=$BUILD –disable-shared –enable-static –with-isl-prefix=$PREFIX –with-gmp-prefix=$PREFIX
make
make install
编译 binutils。
由于是制作工具链,因此要指定 sysroot。编译时禁用多语言支持 (nls) 与链接时优化 (lto)。
[binutils-2.25]
./configure –prefix=$PREFIX –build=$BUILD –target=$TARGET –enable-static –disable-shared –disable-nls –enable-ld –disable-lto –with-sysroot=$PREFIX/$TARGET –with-mpc=$PREFIX –with-mpfr=$PREFIX –with-gmp=$PREFIX –with-cloog=$PREFIX –with-isl=$PREFIX
make
make install
编译 gcc 第一阶段。
此阶段由于还没有编译 mingw-w64 的运行时库 (mingw-w64-crt),因此缺少头文件,只能编译 gcc 的程序,而不能去编译它的库 (libssp libmudflap libgomp libgcc libstdc++-v3 libatomic libvtv libquadmath)。同时也不编译 multilib。Win64 环境下不能使用 DWARF2 异常处理模式,因此要禁用它,转而使用 setjump/longjump 模式。使用 win32 线程模型,不想带一个 winpthreads 库。
[gcc-5.2.0-initial]
./configure –prefix=$PREFIX –build=$BUILD –host=$BUILD –target=$TARGET –program-prefix=$TARGET- –disable-nls –disable-lto –disable-multilib –disable-libssp –disable-libmudflap –disable-libgomp –disable-libgcc –disable-libstdc++-v3 –disable-libatomic –disable-libvtv –disable-libquadmath –enable-sjlj-exceptions –enable-languages=c,c++ –enable-version-specific-runtime-libs –enable-decimal-float=yes –enable-threads=win32 –enable-tls –enable-fully-dynamic-string –with-gnu-ld –with-gnu-as –with-libiconv –with-system-zlib –without-dwarf2 –with-sysroot=$PREFIX/$TARGET –with-local-prefix=$PREFIX/local –with-gmp=$PREFIX –with-mpfr=$PREFIX –with-mpc=$PREFIX –with-isl=$PREFIX –with-cloog=$PREFIX
make
make install
编译 mingw-w64 CRT 库的头文件 (mingw-w64-headers)。
此代码存在于 mingw-w64-v4.0.4 里。其实这是一个完整的 mingw-w64 编译系统,可以自动编译一个完整的 mingw-w64 工具链。但这里我选择了手动编译,这样自由度很高。
头文件安装后,需要做一个 include 文件夹的符号链接,这样才能保证 gcc 第二阶段的编译能够顺利进行 (可以在 gcc 配置脚本中指定,但是这里偷懒,就这样吧)。
[mingw-w64-headers]
./configure –prefix=$PREFIX/$TARGET –build=$BUILD –target=$TARGET –enable-idl –enable-secure-api –with-widl=$PREFIX/bin
make
make install
mkdir $PREFIX/$TARGET/mingw
ls -s ../include $PREFIX/$TARGET/mingw
编译 mingw-w64-crt 所需的程序 (gendef genidl widl)。
此代码依然存在于 mingw-w64-v4.0.4 里。
[gendef]
./configure –prefix=$PREFIX –build=$BUILD
make
make install
[genidl]
./configure –prefix=$PREFIX –build=$BUILD
make
make install
[widl]
./configure –prefix=$PREFIX –build=$BUILD –target=$TARGET
make
make install
编译 mingw-w64-crt。
此代码依然存在于 mingw-w64-v4.0.4 里。
编译时要指定目标编译器,否则生成导入库时会出错。
[mingw-w64-crt]
AR=’$TARGET-ar’ \
AS=’$TARGET-as’ \
CC=’$TARGET-gcc’ \
CXX=’$TARGET-g++’ \
DLLTOOL=’$TARGET-dlltool’ \
RANLIB=’$TARGET-ranlib’ \
./configure –prefix=$PREFIX/$TARGET –build=$BUILD –disable-w32api –disable-lib32 –enable-lib64 –enable-private-exports
make
make install
编译 gcc 第二阶段。
此阶段即为在第一阶段的基础上编译 gcc 自带的库。
编译参数中一定要禁止使用 newlib,否则 libstdc++-v3 会使用 newlib 的头文件而不是 mingw-w64 的头文件,这将导致 libstdc++-v3 因为缺少宏定义以及使用了 Unix 的函数而编译失败。
[gcc-5.2.0-final]
./configure –prefix=$PREFIX –build=$BUILD –host=$BUILD –target=$TARGET –with-local-prefix=$PREFIX/local –program-prefix=$TARGET- –disable-nls –disable-lto –disable-multilib –disable-libssp –disable-libmudflap –disable-libstdcxx-pch –disable-symvers –disable-shared –enable-static –enable-languages=c,c++ –enable-libstdcxx-debug –enable-version-specific-runtime-libs –enable-decimal-float=yes –enable-threads=win32 –enable-tls –enable-fully-dynamic-string –with-gnu-ld –with-gnu-as –with-libiconv –with-system-zlib –without-newlib –with-sysroot=$PREFIX/$TARGET –with-gmp=$PREFIX –with-mpfr=$PREFIX –with-mpc=$PREFIX –with-isl=$PREFIX –with-cloog=$PREFIX
make
make install
编译 libiconv。
这是给第二阶段的 gcc 编译做准备的,这个库必须安装在第一阶段工具链中。
此版本代码需要打一个补丁才能成功编译:
--- a/srclib/stdio.in.h
+++ b/srclib/stdio.in.h
@@ -695,8 +695,10 @@
 /* It is very rare that the developer ever has full control of stdin,
    so any use of gets warrants an unconditional warning.  Assume it is
    always declared, since it is required by C89.  */
+#if defined(__GLIBC__) && !defined(__UCLIBC__) && !__GLIBC_PREREQ(2, 16)
 _GL_WARN_ON_USE (gets, "gets is a security hole - use fgets instead");
 #endif
+#endif


 #if @GNULIB_OBSTACK_PRINTF@ || @GNULIB_OBSTACK_PRINTF_POSIX@
[libiconv-1.14]
./configure –prefix=$PREFIX/$TARGET –build=$BUILD –host=$HOST –enable-extra-encodings –enable-static –disable-shared –disable-nls –with-gnu-ld
make
make install
至此工具链制作完成,位于 $PREFIX 中。
以下为第二阶段的编译过程:
编译环境:
编译环境 (build): x86_64-pc-linux-gnu (Ubuntu 15.04 AMD64)
运行环境 (host): x86_64-w64-mingw32 (Windows mingw-w64)
目标环境 (target): x86_64-w64-mingw32
生成的工具链目录 (prefix): /mingw64
工具链存放目录:/home/hackpascal/mingw
设置环境变量:
export PREFIX=/mingw64
export TARGET=x86_64-w64-mingw32
export HOST=$TARGET
export BUILD=x86_64-pc-linux-gnu
export PATH=$PATH:/home/hackpascal/mingw/toolchain/usr/bin
export OUTPUT_PATH=/home/hackpascal/mingw
建立符号链接:
这是为了偷懒才这么做的。。。
第一个链接是为了编译代码时方便定位已经安装的库;第二个链接是 gcc 配置文件中默认的包含文件目录的位置。
sudo ln -s $OUTPUT_PATH$PREFIX $PREFIX
sudo ln -s $PREFIX /mingw
编译 gcc 所依赖的库 gmp mpfr mpc isl cloog。
由于 Windows 搜索动态链接库的特性,这些库都编译为动态链接库 (.dll) 以便节省空间。
[gmp-6.0.0]
./configure –prefix=$PREFIX –build=$BUILD –host=$HOST –enable-cxx –enable-shared –disable-static
make
make install DESTDIR=$OUTPUT_PATH
[mpfr-3.1.3]
./configure –prefix=$PREFIX –build=$BUILD –host=$HOST –with-gmp=$PREFIX –enable-shared –disable-static
make
make install DESTDIR=$OUTPUT_PATH
[mpc-1.0.3]
./configure –prefix=$PREFIX –build=$BUILD –host=$HOST –with-mpfr=$PREFIX –with-gmp=$PREFIX –enable-shared –disable-static
make
make install DESTDIR=$OUTPUT_PATH
[isl-0.12]
./configure –prefix=$PREFIX –build=$BUILD –host=$HOST –with-gmp-prefix=$PREFIX –enable-shared –disable-static
make
make install DESTDIR=$OUTPUT_PATH
[cloog-0.18.4]
./configure –prefix=$PREFIX –build=$BUILD –host=$HOST –with-isl-prefix=$PREFIX –with-gmp-prefix=$PREFIX –enable-shared –disable-static
make
make install DESTDIR=$OUTPUT_PATH
编译 binutils。
不需要指定 sysroot。
[binutils-2.25]
./configure –prefix=$PREFIX –build=$BUILD –host=$HOST –target=$TARGET –enable-shared –disable-nls –enable-ld –disable-lto –with-mpc=$PREFIX –with-mpfr=$PREFIX –with-gmp=$PREFIX –with-cloog=$PREFIX –with-isl=$PREFIX
make
make install DESTDIR=$OUTPUT_PATH
编译 m4 和 libtool。
这两个工具是在编译由 automake + autoconf 生成的代码包时可能用到的。
[m4-1.4.17]
./configure –prefix=$PREFIX –build=$BUILD –host=$HOST –enable-threads=windows –enable-c++
make
make install DESTDIR=$OUTPUT_PATH
[libtool-2.4.6]
./configure –prefix=$PREFIX –build=$BUILD –host=$HOST –with-gnu-ld –enable-ltdl-install –enable-shared –disable-static
make
make install DESTDIR=$OUTPUT_PATH
编译 mingw-w64 所需的库和工具。
此代码存在于 mingw-w64-v4.0.4 里。
[libmangle]
./configure –prefix=$PREFIX –build=$BUILD –host=$HOST
make
make install DESTDIR=$OUTPUT_PATH
[gendef]
./configure –prefix=$PREFIX –build=$BUILD –host=$HOST –with-mangle=$PREFIX
make
make install DESTDIR=$OUTPUT_PATH
[genidl]
./configure –prefix=$PREFIX –build=$BUILD –host=$HOST
make
make install DESTDIR=$OUTPUT_PATH
[genpeimg]
./configure –prefix=$PREFIX –build=$BUILD –host=$HOST
make
make install DESTDIR=$OUTPUT_PATH
编译 widl 需要注意的是:在交叉编译时,configure 脚本对 malloc 以及 realloc 的检测会出错,因此需要手动指定它们的检测结果。
[widl]
ac_cv_func_malloc_0_nonnull=yes \
ac_cv_func_realloc_0_nonnull=yes \
./configure –prefix=$PREFIX –build=$BUILD –host=$HOST –target=$TARGET –program-prefix=””
make
make install DESTDIR=$OUTPUT_PATH
编译 mingw-w64 CRT 库的头文件 (mingw-w64-headers)。
也可以直接复制第一阶段编译好的文件。
[mingw-w64-headers]
./configure –prefix=$PREFIX –build=$BUILD –host=$HOST –target=$TARGET –enable-idl –enable-secure-api
make
make install DESTDIR=$OUTPUT_PATH
编译 mingw-w64-crt。
也可以直接复制第一阶段编译好的文件。
[mingw-w64-crt]
AR=”$TARGET-ar” \
AS=”$TARGET-as” \
CC=”$TARGET-gcc” \
CXX=”$TARGET-g++” \
DLLTOOL=”$TARGET-dlltool” \
RANLIB=”$TARGET-ranlib” \
./configure –prefix=$PREFIX –build=$BUILD –host=$HOST –disable-w32api –disable-lib32 –enable-lib64 –enable-private-exports
make
make install DESTDIR=$OUTPUT_PATH
编译 mingw-w64 的附加库。
winpthreads 是在 Windows 下实现的 pthread 兼容的线程库,用于 c++11 的 std::thread 等功能。
winstorecompat 用于支持 Windows Store 应用程序开发。
[winpthreads]
./configure –prefix=$PREFIX –build=$BUILD –host=$HOST –enable-shared –enable-static –with-gnu-ld
make
make install DESTDIR=$OUTPUT_PATH
[winstorecompat]
./configure –prefix=$PREFIX –build=$BUILD –host=$HOST
make
make install DESTDIR=$OUTPUT_PATH
编译 gcc。
由于所需的库和头文件都已准备就绪,因此编译一次即可。
编译参数指定了使用 posix 线程模型,以便支持 c++11 的新特性。
给 gcc 打一个补丁以便让 x86_64 架构支持 SEH 异常处理模型:
--- a/libgcc/config.host
+++ b/libgcc/config.host
@@ -703,11 +703,7 @@
 	    ;;
 	esac
 	# This has to match the logic for DWARF2_UNWIND_INFO in gcc/config/i386/cygming.h
-	if test x$enable_sjlj_exceptions = xyes; then
-		tmake_eh_file="i386/t-sjlj-eh"
-	else
 		tmake_eh_file="i386/t-seh-eh"
-	fi
 	# Shared libgcc DLL install dir depends on cross/native build.
 	if test x${build} = x${host} ; then
 		tmake_dlldir_file="i386/t-dlldir"
[gcc-5.2.0]
./configure –prefix=$PREFIX –build=$BUILD –host=$HOST –target=$TARGET –with-local-prefix=$PREFIX/local –disable-nls –enable-lto –disable-multilib –disable-win32-registry –disable-libstdcxx-pch –disable-symvers –enable-shared –enable-static –enable-languages=c,c++ –enable-libstdcxx-debug –enable-version-specific-runtime-libs –enable-decimal-float=yes –enable-threads=posix –enable-tls –enable-fully-dynamic-string –with-gnu-ld –with-gnu-as –without-newlib –with-libiconv –with-gmp=$PREFIX –with-mpfr=$PREFIX –with-mpc=$PREFIX –with-isl=$PREFIX –with-cloog=$PREFIX
make
make install DESTDIR=$OUTPUT_PATH
编译 libiconv。
libiconv 不能先于 gcc 编译安装到第二阶段工具链的目录里,否则会导致 gcc 引用了错误的头文件而导致编译失败。
因此第一阶段就将 libiconv 编译安装到了第一阶段的工具链目录中。
但是此时还需要为第二阶段的工具链编译一次,以便第二阶段工具链的程序能够正常运行。
[libiconv-1.14]
./configure –prefix=$PREFIX –build=$BUILD –host=$HOST –enable-extra-encodings –enable-static –disable-nls –with-gnu-ld
make
make install DESTDIR=$OUTPUT_PATH
最后将 gcc 异常处理库文件复制到程序目录
cp $PREFIX/lib/gcc/$TARGET/*.dll $PREFIX/bin
将 libgcc_s.a 复制到 lib 目录
cp $PREFIX/lib/gcc/$TARGET/lib/* $PREFIX/lib
至此运行于 Windows 平台的工具链制作完成。
如果想要去掉工具链程序中的调试信息以便节省空间,可以在工具链目录中运行如下命令:
find ./ -name ‘*.exe’ -o -name ‘*.dll’ | xargs $TARGET-strip -s
前面建立的两个符号链接也可以删掉了:
sudo rm -f $PREFIX
sudo rm -f /mingw
千万记得不要使用 -r 参数,否则就得重来一次 make install 了。
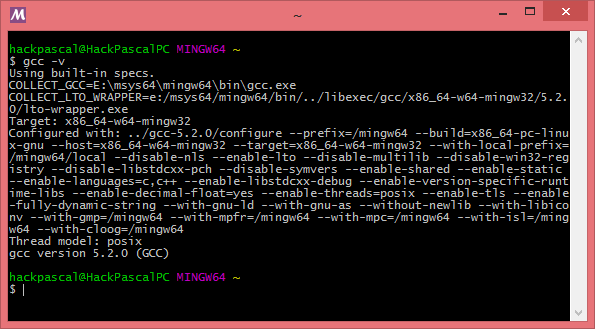
运行效果:
hack
我是阿勇,网站openwrtdl.com,都是玩openwrt的,加个友情连接吧
我的每一个文章中都有友情连接,互加吧
http://www.openwrtdl.com/wordpress/a-lot-of-luci-app-resource-sharing-download
你好 H大,手里有2台AP2600I ,能不能给你一台测试,帮忙做个breed,恩山已经PM你了 麻烦告诉我收货地址,感谢!
老大 breed 优酷的该更新了,新版本好多不能用 老版本兼容性好点
年中快乐!
博客不错,嘎嘎!
直接上 WIN10 吧,新版的 Bash on Ubuntu on Windows 已经挺完善了。
你好大神,我是一名做山寨无线网桥的,最近用842V4改无线网桥,芯片是qca9531/qca9533,我现在用的固件,复位键阵脚为gpio17,但是842等tp主板复位键均为GPIO12,我想麻烦大神帮我改一下固件内复位阵脚为GPIO12,使得可以直接通过842主板复位键进行固件复位,不知大神是否愿意帮助我,价钱方面咱俩详谈…,我的电话跟微信为15253677678,qq305113796